Microsoft Visual C++ v6.0 provides a rich set of features that can help you as you write and test code for your programming assignments this term. The brief tutorial on this page is designed to step you through the basics of creating and running a new program using Visual C++ so that you can begin to get comfortable using the tool.
In this tutorial, we will build and run a simple program that involves a single C++ class. Our program will include a main() function that creates an object of this class and calls a couple of methods on the object before exiting. Once you get up and running with the example presented here, I encourage you to take some time to explore other features of Visual C++ on your own.
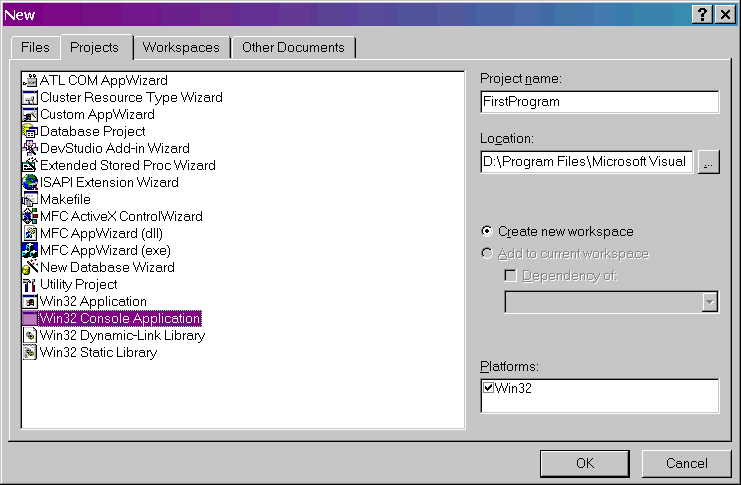
The set of files that constitutes a program in Visual C++ is organized into a unit called a "project". So to start working on a new program, you must create a new project to store your files. To do this, start Visual C++ and then choose File / New from the menu. You will see a dialog box appear that looks like this:
In this dialog, select "Win32 Console Application" as the project type and give the project a name of "FirstProgram" as shown above. Set the Location field to the directory that you want to contain your project directory. Once you've changed these settings, click OK to get to the next dialog box, which looks like this:
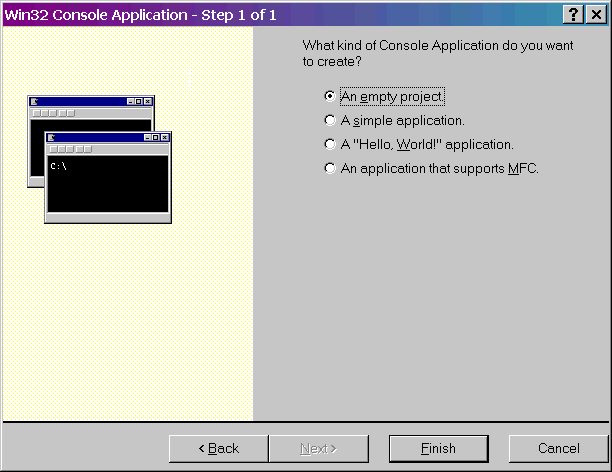
Select "An empty project" from the list of choices, and then click on Finish. Next, click OK on the confirmation window that appears.
Congratulations! You've just created a new project.
Now it's time to add a class to your project. We will implement a simple class called CMyClass. This class will contain one integer as a member variable and will provide two methods to get and set the value of this integer.
Visual C++ includes wizards that can automate some of the process of adding a new class to the project. But since it is important for you to understand what goes on behind the scenes, we will add and edit the class files manually.
Remember, each C++ class requires a header file (.h) that contains the definition of the class and an implementation file (.cpp) that contains the actual bodies of the methods. We'll create the header file first. Choose File / New from the menu again. Since a current project already exists, you get a different dialog box now, which looks like this:
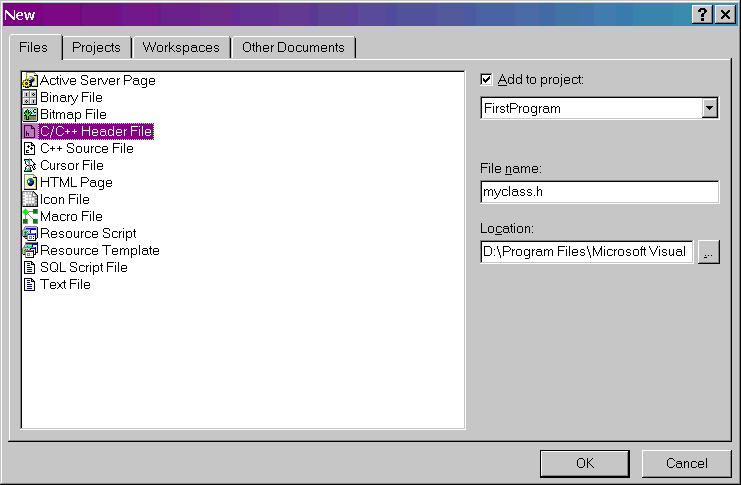
Choose "C/C++ Header File" as the file type and give the file a name of "myclass.h" as shown above. (The rest of the settings can remain at their defaults.) Click OK and you will see a blank file appear in the main window called "myfile.h". Enter the following code into this window:
#ifndef MYCLASS_H
#define MYCLASS_H

class CMyClass {
public:
	void setValue(int value);
	int getValue();
private:
	int m_value;
};

#endif
This code defines our simple class including the integer attribute and the accessor methods for changing its value. Save the file by hitting CTRL-S before proceeding.
Now we need to add another file to contain the implementation of our class methods. Go back to the File / New menu to bring up the new file dialog. This time, choose "C++ Source File" as the file type and name it "myclass.cpp". Click OK and, again, you will see a blank file appear in the main window. Enter the following code into this window:
#include "myclass.h"

int CMyClass::getValue() {
	return m_value;
}

void CMyClass::setValue(int value) {
	m_value = value;
}
Save the file. Congratulations! You've now added a class to your project. Notice if you expand the tree control in the left-hand window pane as shown below, you can see a graphical representation of your class:
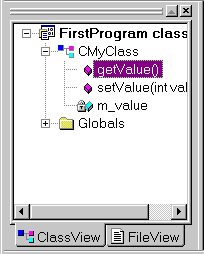
If you double-click on the class name (CMyClass) or an attribute, Visual C++ will automatically show the class header file in the main window area. If you double-click on a method, the class implementation file will appear.
Next, we need a main() function to serve as the starting point for the program. This requires another file. Go back to the File / New dialog box, choose "C++ Source File" as the file type again, and give the file a name of "main.cpp". Enter the following code into the "main.cpp" file:
#include <iostream>
using namespace std;

#include "myclass.h"

int main() {

	CMyClass myObject;
	myObject.setValue(200);
	int var = myObject.getValue();

	cout << "The value of the variable is " << var << ".\n";

	return 0;

}
This main() function creates an object of the CMyClass class. It then calls the setValue() method we defined to set the value of the object's member variable. Next, it calls getValue() to get the value from the object and assigns it to a local variable called "var". Finally, we use the cout object to print the value of the variable to the screen.
When you have finished coding the function, save the file.
You're now ready to test the program. Compile and link it by selecting Build / Build FirstProgram.exe from the menu. If you get any errors or warnings, double-check your code for typing mistakes.
Next, choose Build / Execute FirstProgram.exe from the menu to run the program. If you see output that resembles the following, you have successfully built and run your program:

Visual C++ provides an excellent graphical debugger that can help you correct problems in your code. Let's test it out using the simple program we just developed.
Stepping (or "tracing") through code line by line as it executes is a great way to uncover bugs. Visual C++ allows you to do this, and let's you examine the state of the program as it's running. You can check the values of local variables, object member variables, and the call stack, among other things.
To start tracing through your program, press the F11 key. The Visual C++ interface will change to something resembling the following:
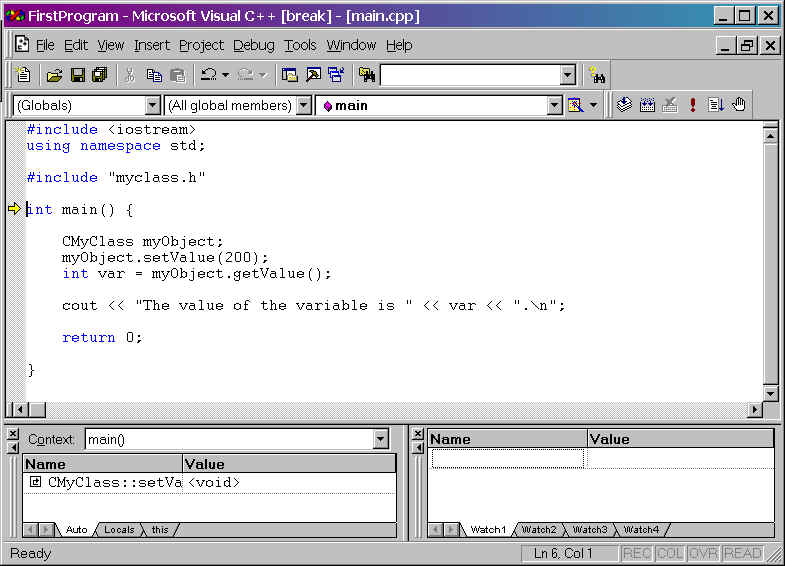
Notice the yellow arrow next to the beginning of the main() function. The arrow marks the next line of code that the computer will execute, which is the first line of the program in this case.
There are two important shortcut keys to keep in mind when stepping through code: the "Step Into" key (F11) and the "Step Over" key (F10). When the arrow points to a line that contains one or more function calls, the Step Into key tells the debugger to step into the function that is being called. In other words, pressing F11 causes the debugger to move the arrow to the first line of function being called so that you can step through that function's code. In contrast, the Step Over key tells the debugger to execute the function without stepping through its code. In other words, pressing F10 causes the debugger to move the arrow to the next line of the current function.
Try stepping through the code of your program several times using the F10 and F11 keys to get used to the difference between then. Specifically, try stepping into the two methods, getValue() and setValue().
Caution: If you select Step Into at certain lines of code (such as the cout line) you might see some strange C++ code or even assembly language appear on the screen. What you are actually seeing is the code that Visual C++ uses internally to support your program. If you get into this situation, you can try pressing SHIFT-F11. (SHIFT-F11 is the "Step Out" key, which returns you to the function that called the current function.) If you get really lost, you can also press F5, which will cause the debugger to run the program from your current position without stepping. Similarly, SHIFT-F5 will stop the program completely.
Hint: When you reach the last line of your main() function (i.e. the closing brace), always hit F5 to finish the program off. Otherwise, Visual C++ will try to step through some of its own clean-up code.
As you step through code, you may notice that the bottom left-hand section of the debugger interface shows you the values of variables that have recently been changed. For example, when the program reaches the point shown below, you can see that the variable called "var" has just been assigned the value 200:
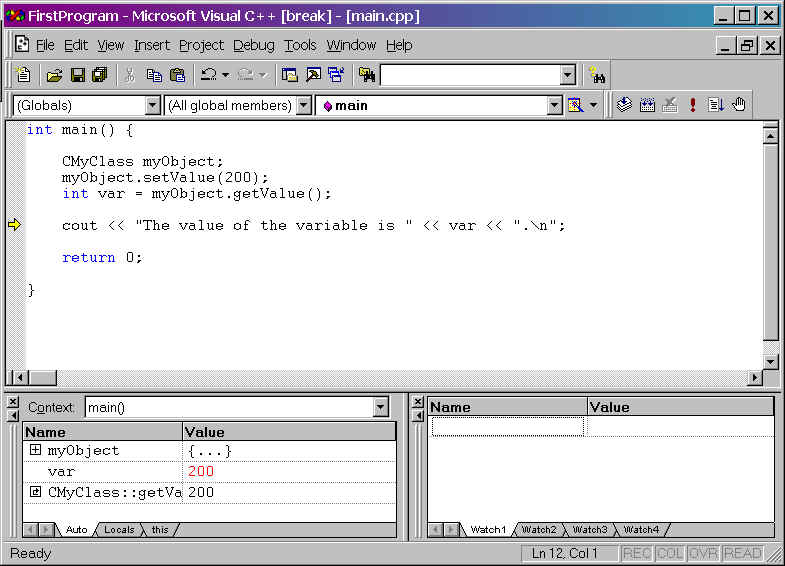
This is called the Variables window and it has three modes, which you can select by clicking on the tabs below the window. In "Auto" mode, the window shows the values of variables that recently changed or the output of recent function calls. In "Locals" mode, the window shows the values of all local variables. In "this" mode, the window shows the value of all member variables of the current object. Note that you can also change the values of the variables at run-time using this window, too.
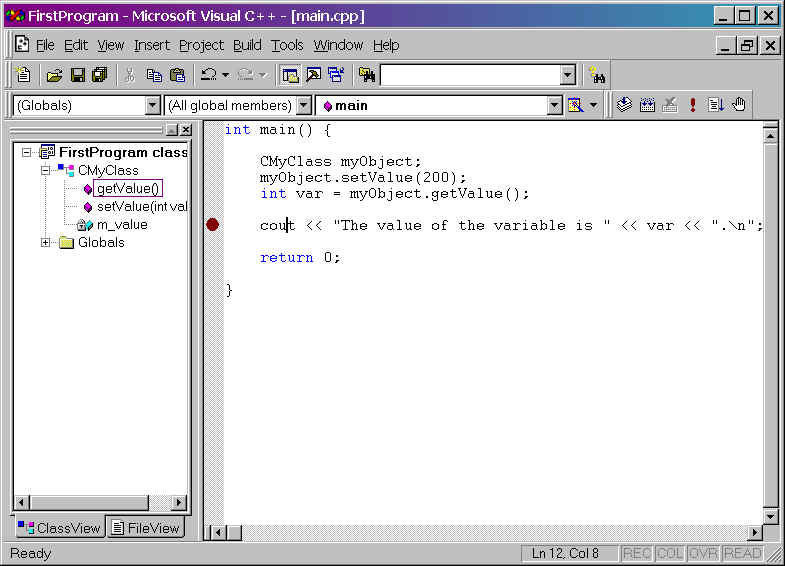
If you want to run your program up to a certain point without stepping through all the code before that point, you can define "breakpoint" lines. To set a breakpoint, right-click on a line of code in your program and choose Insert/Remove Breakpoint from the menu. A red dot will appear next to the line with the breakpoint. In the example below, I've set a breakpoint at the cout line:
Once you've set one or more breakpoints, select Build / Start Debug / Go from the menu or press F5. Your program will run until it hits the line of code with the breakpoint, and then pauses. You can now step through the code and examine variables as you wish.
You have now been introduced to some of the basic features of Visual C++ that will help you write, build, and debug your programming assignments throughout the term. Needless to say, there are many more features in Visual C++, and I would encourage you to explore them on your own. In the meantime, I hope after completing this tutorial that you feel more comfortable using the tool and have gained the basic skills needed to start putting it to work.